
Setup Domain Branded Email
Our Problem
A professional email address is essential for running a legitimate business. Customers expect to communicate with businesses through branded email accounts like info@yourbusiness.com, rather than generic addresses such as Gmail or Yahoo. A business email builds trust, improves brand perception, and ensures that your messages get delivered without landing in spam folders.
While several email providers exist, Google Workspace (formerly G Suite) is the best option for most businesses. It offers a seamless setup process, integrates easily with Google services, and has significantly better email deliverability compared to Microsoft 365 and other providers. However, Google now pushes new users into a more expensive plan with a free trial by default. Fortunately, after setup, we can adjust the plan settings and switch to the lowest-priced option at $7 per user per month to keep costs manageable.
Solution Overview
Google Workspace is a cloud-based email and productivity suite that allows businesses to create and manage professional email accounts with their own domain names. It provides the same Gmail interface that most people are already familiar with but under a custom domain (e.g., yourname@yourcompany.com).
Why choose Google Workspace?
Ease of Setup – The process is straightforward without advanced IT knowledge.
Better Email Deliverability – Google’s servers have a strong reputation, reducing the likelihood of emails being marked as spam.
Seamless Integration – Works perfectly with Google Drive, Calendar, Meet, etc.
Reliable and Secure – Google’s infrastructure ensures 99.9% uptime and industry-leading security.
With these benefits in mind, let’s walk through the setup process step by step.
Step by Step
Sign Up for Google Workspace

Start by visiting Google Workspace and clicking Get Started. You’ll be prompted to enter basic business information, including your business name, number of employees, and contact information (use your personal contact info). Google will also ask whether you already have a domain name.
- If you already own a domain, select “Yes, I have one I can use” and enter it.
- If you do not have a domain yet, Google offers the option to purchase one during setup, but we recommend buying it separately from GoDaddy or another registrar to keep your services flexible. Go back to the previous guide if you haven’t done this yet.
Google will guide you through account creation, including setting up your first email address (e.g., info@yourbusiness.com) and creating a password. Use a Generic email with the domain we just purchased to start with if you only want to use one user.
Choose a Google Workspace Plan
At this stage, Google forces new users into the Business Standard plan (which costs $28 per user per month after the free trial). They think they are slick lol. However, we can downgrade this plan to the Business Starter plan ($7 per user per month) after completing the setup. Proceed with the default trial for now – we’ll make adjustments later.
Verify Your Domain
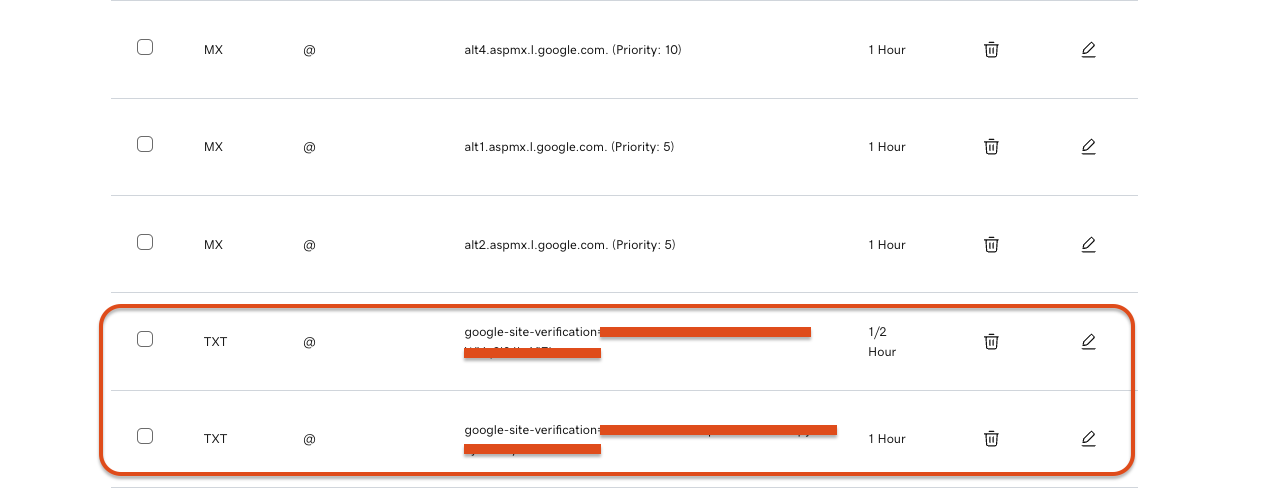
To activate Google Workspace, you need to verify ownership of your domain. Google provides a TXT record that must be added to your domain’s DNS settings (this is back at Godaddy under your domain settings.
- For GoDaddy users, log in to your GoDaddy account, go to DNS settings, and add the TXT record provided by Google.
- For other domain registrars, follow their instructions to update DNS records.
Once the TXT record is added, return to Google Workspace and click Verify. It may take a few minutes for Google to recognize the update.
Set Up MX Records for Email Delivery
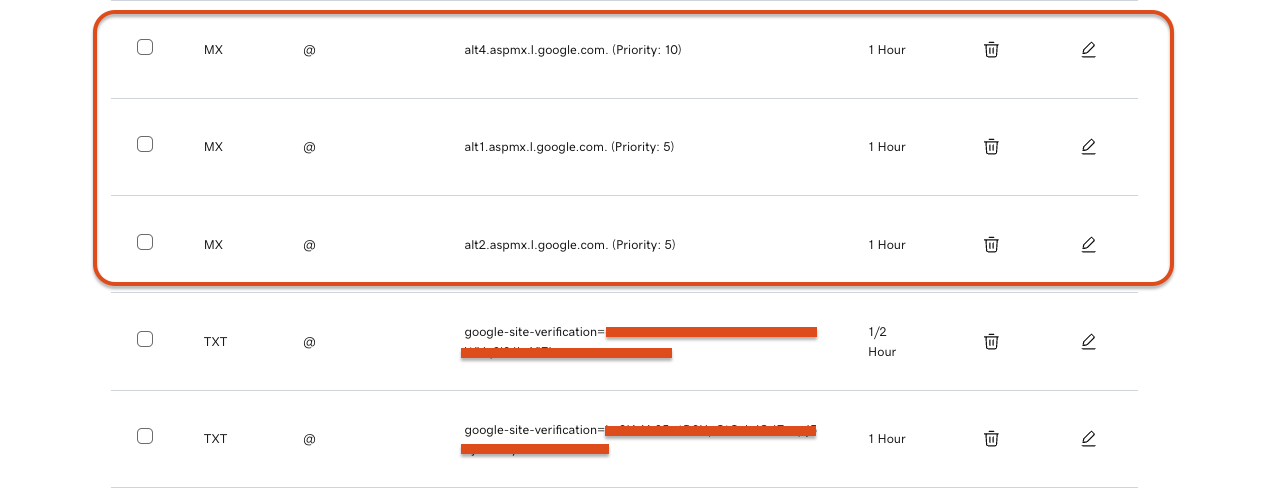
Next, you’ll need to configure MX records to direct email traffic through Google’s servers. Google provides a list of MX records that must be added to your domain’s DNS settings.
- Remove any existing MX records in your domain’s settings.
- Add the MX records provided by Google (typically five entries).
- Save the changes and return to Google Workspace to confirm the setup.
Once completed, your custom email address will begin receiving emails through Google’s system. Don’t worry if you get stuck I can help with this part but it’s helpful for you to know where to find these later. (Congrats! you’re now more educated than most marketing agencies & freelancers)
Adjust Your Google Workspace Plan
Since Google initially places you on the Business Standard Plan, it’s important to switch to the lower-cost Business Starter Plan before the trial period ends. Do it now so you don’t forget Hoss.
- Navigate to Google Admin Console
- Click Billing > Subscriptions
- Select Change Plan and choose Business Starter ($7 per user per month)
- Confirm the change to avoid paying for unnecessary features
This adjustment ensures you keep all the essential features at a more affordable price.

Create Additional Email Users (If Needed)
If your business requires multiple email accounts (e.g., support@yourbusiness.com, billing@yourbusiness.com), you can add them under the Users section in the Google Admin Console. Each additional user will be billed at the selected plan rate.
Alternatively, to save costs, you can create email aliases for different roles (e.g., having info@yourbusiness.com and support@yourbusiness.com forward to your main inbox).

Wrapping Up
Setting up Google Workspace provides a professional, reliable, and secure email solution for your business. It ensures your emails reach inboxes instead of spam folders, integrates seamlessly with Google’s productivity tools, and offers an intuitive setup process.
By following these steps, you’ll have a fully functional branded email system in place, giving your business a more credible and professional online presence
“The secret of success is to do the common thing uncommonly well.” – John D Rockafeller


