
Using Canva to Create Content FAST
Our Problem
Creating professional-looking graphics at scale can feel overwhelming for agencies and businesses alike. While tools like Canva make design accessible, it still takes a ton of time to create all this content and as business owners, let’s face it… You’re already busier than a one-legged man in an ass-kicking contest.
Not to worry though… technology to the rescue!
But, not overly complicated and confusing technology or anything you need to be afraid of. I am gonna break it down (sorry if that gave you flashbacks of itemized quotes) for you here real quickly on how we can use Canva to modify a ton of stuff for you all at one time so you can rebrand templates and create hundreds of posts quickly
Solution Overview
To put things simply we are going to use a few functions built into Canva to change EVERYTHING at one time – well almost everything. Bust first you need a MASSIVE pile of templates all set up properly to make this process work correctly – and imagine that… We have already built that out for you!
- Over 170+ different graphic layouts
- Placeholders for 6 Services & 6 Locations
- Quickly change out urls, phone numbers, services, logos, & colors
“Efficiency is doing things right; effectiveness is doing the right things.” – Peter Drucker
So let’s get down to “brass tacks” and start learning you up on how to use Canva to speed up your graphic design process for all these posts!
Step by Step
Save yourself a copy so you can edit the files
Saving a copy of these templates is simple – just click on the file and navigate to the option for “Save a copy” while logged into your own Canva account like the screenshot below. You’ll now have your copy in your Canva account that you can run a search & replace on to swap out variables as well as change colors globally using the branding options!
Set up your brand kit inside Canva
The brand kit is a pro feature but it will save us a significant amount of time when modifying these templates to fit your brand colors, logos, and fonts. Make sure before you go any further that you have upgraded to the pro account (get a trial and cancel after this process if you need to).
First up, we will swap the logo across all our designs. This process alone will save an hour of you copying and pasting logos across all the slides, however, we have a bit of work to do first with our logo. To swap the logo – YOUR LOGO FILE MUST BE 1:1 SQUARE ASPECT RATIO. If you need help with this you can hire a designer on Fiverr or use Canva to export a 1:1 or square aspect ratio logo (with a background transparency if necessary to fill space).
Begin by clicking on the “brand” section from the navigation menu on the left-hand side on your dashboard after signing in and opening the template “brand kit” by clicking on it as shown below. If you have multiple brands already entered into Canva you will need to make sure to select the brand template that matches the image below for the content to swap properly.

Let’s swap out that logo
Once you have opened the brand kit we will need to hover over the logo and click the three dots at the top right corner as shown below. Select the option for “Replace across designs”. This will open a dialog box that will allow you to upload a logo file.
![]()
Remember from above the logo file needs to be a square aspect ratio or the upload will fail. You can see we have included my logo with a transparent background and uploaded it here.
By clicking the preview button you will be asked to select multiple projects/designs that the specific placeholder logo file from the template’s “brand kit” is included inside of. If you have downloaded the social media template & other graphic templates select ALL of the options to replace the logo in all the files at one time. (I only have one option as i have not downloaded them all to write the guide.) Now your logo will be replaced across all of the slides! Do a happy dance because you just got about 2 hours of your life back…
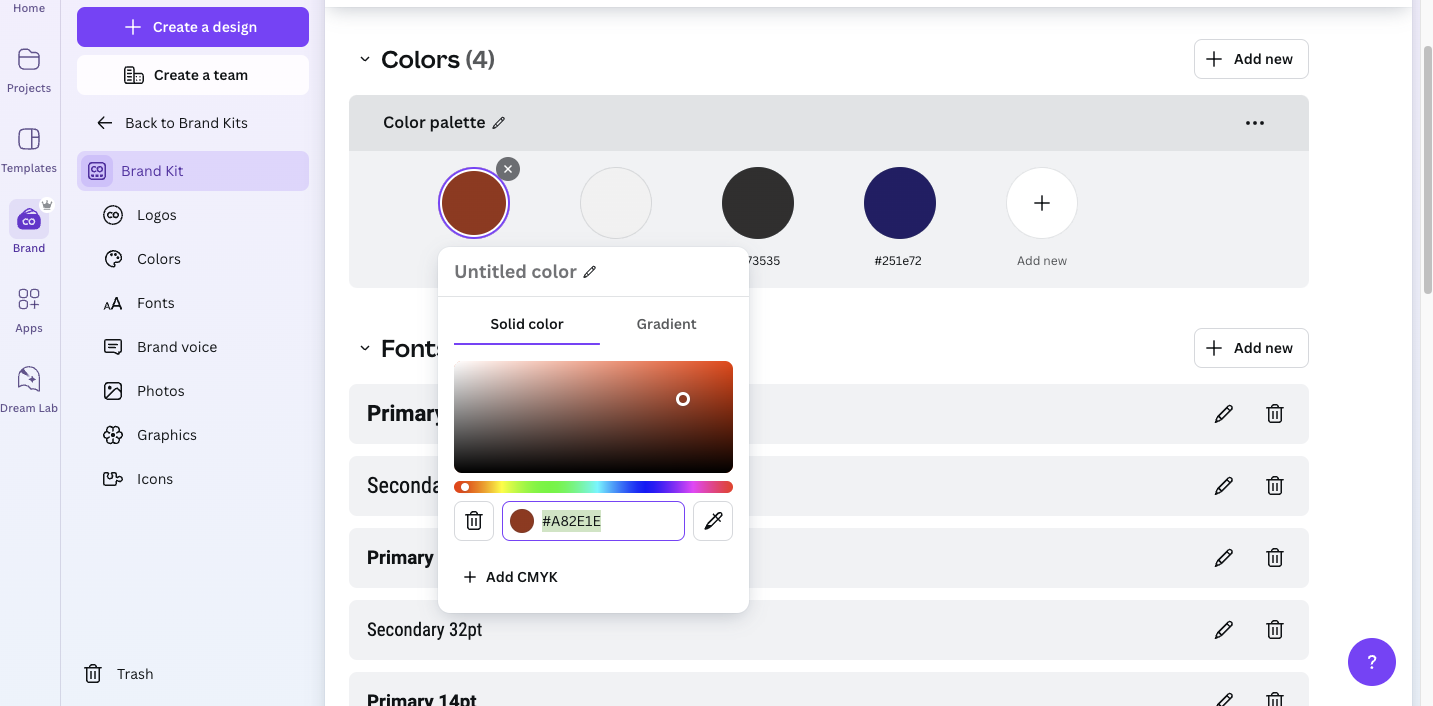
Updating your brand colors
Next up, we are going to swap out the colors in your brand kit. To do this, all you have to do is click on the brand kit colors and enter a new color code or use the color picker to select the appropriate color for your new brand kit.
Repeat the process as needed to add your colors. Do not remove colors but feel free to add new ones if you require more than five colors.
We recommend including the following:
- Primary color
- Secondary Color
- Muted Color
- Dark Color
Finally its font time
Lastly, we just need to swap the fonts into your Brand kit. This step is fairly simple however it is important to make sure that as you swap fonts you keep the “relative size” close to the same as the original. Some fonts are naturally larger than others and the closer you can keep the fonts to the originals, the less clean-up work you will have at the end.
To change the fonts just click the pencil icon and then select the font and style changes you prefer in the boxes for each font. Make sure to click the check mark before moving on to the next fonts until you have swapped them all. Do not remove fonts. If you would prefer to only have a primary font and a body font then simply change the secondary fonts to match your primary as you go.
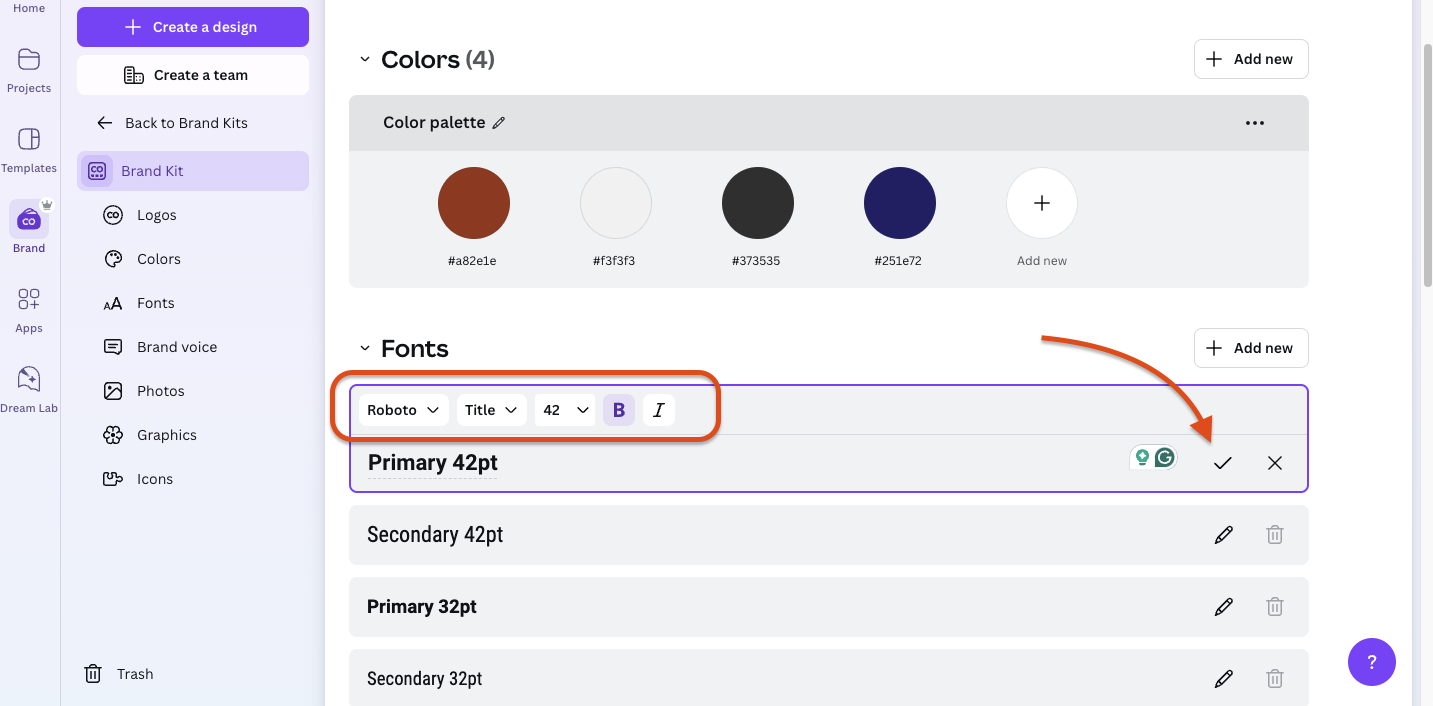
Double-check your work and make sure you haven’t missed anything before we move to the next step! Here you can see I have swapped the colors and fonts to match my new “brand kit”. Yours should look like this and nothing should remain from the original Brand Kit now.
Now let’s add a splash of color (or colour if you’re weird)
To swap the colors of your new “brand kit” into the slide templates go ahead and open the design by clicking Projects and selecting your design on the navigation menu to the left. Then, open up one of the slides, navigate to the “brand” tab on the navigation menu, hover over it, and select “shuffle” in the colors section. Repeat this process as necessary until you like how the colors look on your slides (we can also do this later on in the slides individually as needed). Select “Apply to all pages” to change the full slide deck to match your colors once you are happy with your new look!
Do another happy dance because now we are up to 5 total hours of your life saved!
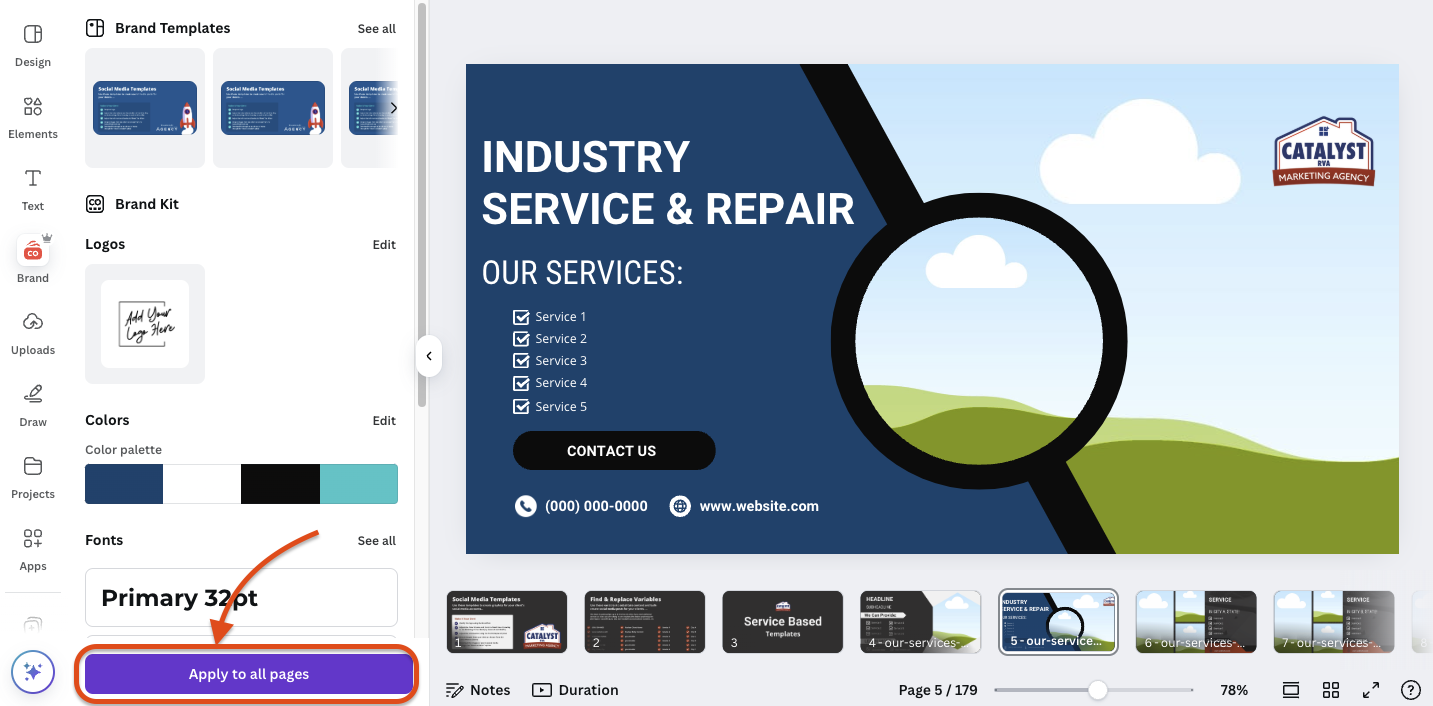
To swap the colors of your new “brand kit” into the slide templates go ahead and open the design by clicking Projects and selecting your design on the navigation menu to the left. Then, open up one of the slides and navigate to the “brand” tab on the navigation menu then hover over it, and select “shuffle” in the colors section. Repeat this process as necessary until you like how the colors look on your slides (we can also do this later on in the slides individually as needed). Select “Apply to all pages” to change the full slide deck to match your colors once you are happy with your new look!
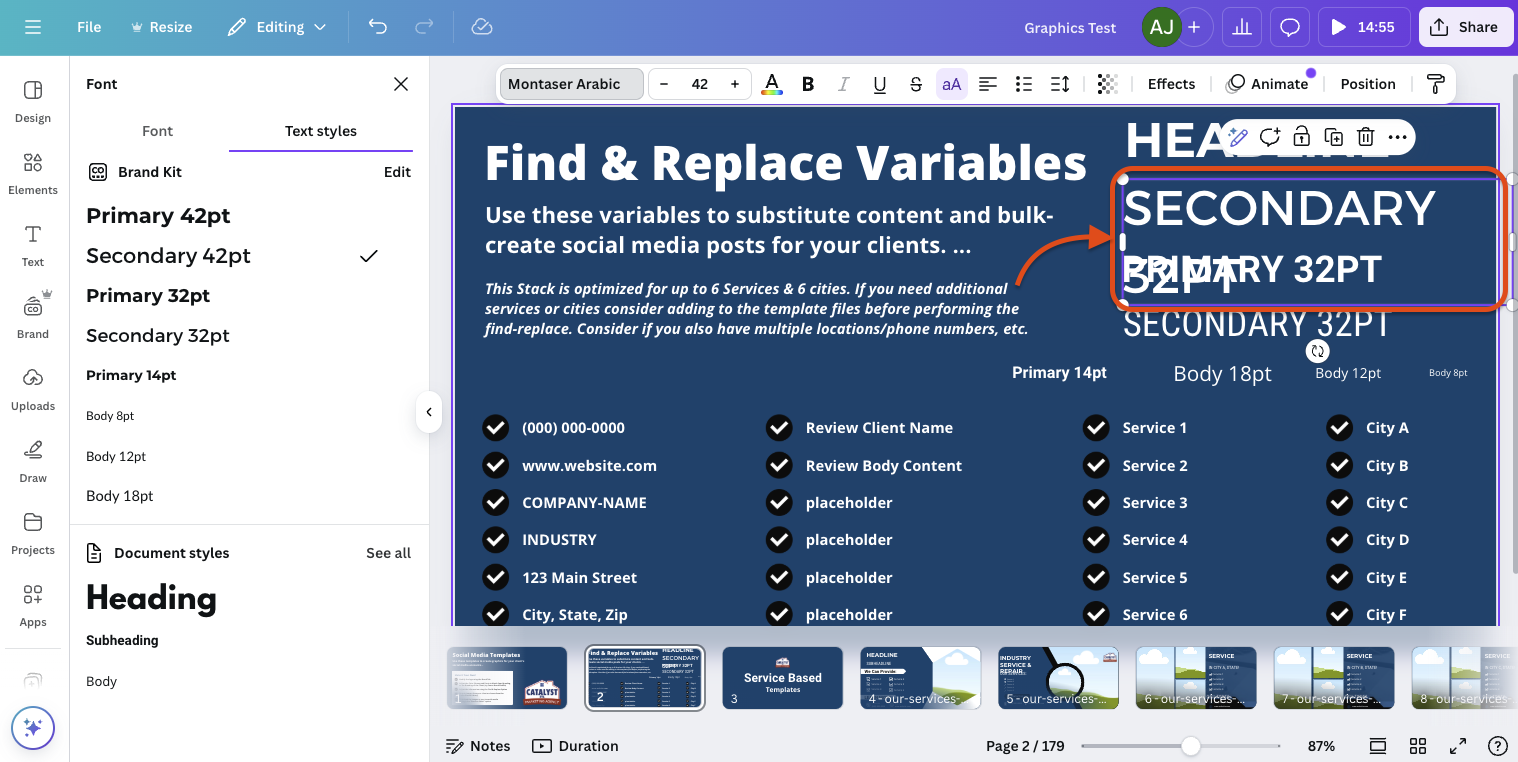
Copying fonts for the slides (oh my!)
Things are starting to shape up – let’s take care of those fonts now! Navigate to the second slide in the deck labeled “Find & Replace Variables”. We are going to follow a very specific order to change each of the fonts across the entire slide deck at the same time. To change the primary 42pt text first click on the text, then the font in the formatting bar (2). Next, toggle to the text style tab (3) and select the newly added “Primary 42pt” text style you added in the brand kit (4).
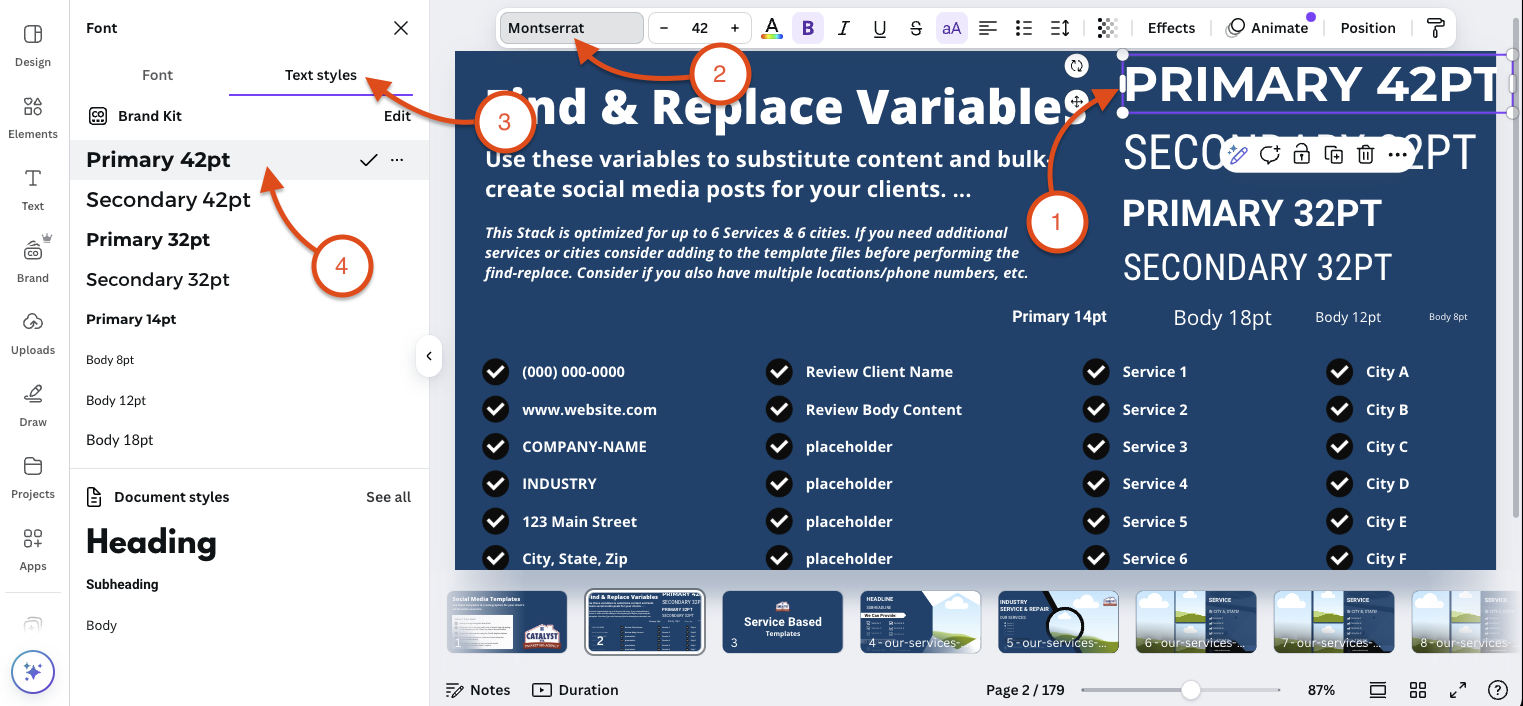
If everything worked how we wanted you will be able to click the “Change All” button that appears in the lower left corner. However, if we see the newly selected font is far too large compared to the original text like in the example below, we will need to make some changes by clicking the edit tab in the fonts section to the left.
Simply modify the font size until it matches better with the original text size from the template brand kit and then follow the steps to update the text from the previous steps. Don’t forget to click “Change All” to apply your text changes to the entire document. Repeat this process for all of the text styles you would like to modify to match your original brand kit. Repeat a happy dance break.
The ✨ Find & Replace✨ Tool (as close as we can get to magic)
In the next step, we will swap out the placeholder content. Make sure you retain the formatting as the content is keyed into the slide (ex. The parentheses and spacing in the phone number). To do the find & replace press cmd+F or Ctrl+F to open the dialog box below. Paste in the placeholder (notice it shows 74 items found) and then key in the details for your specific business.
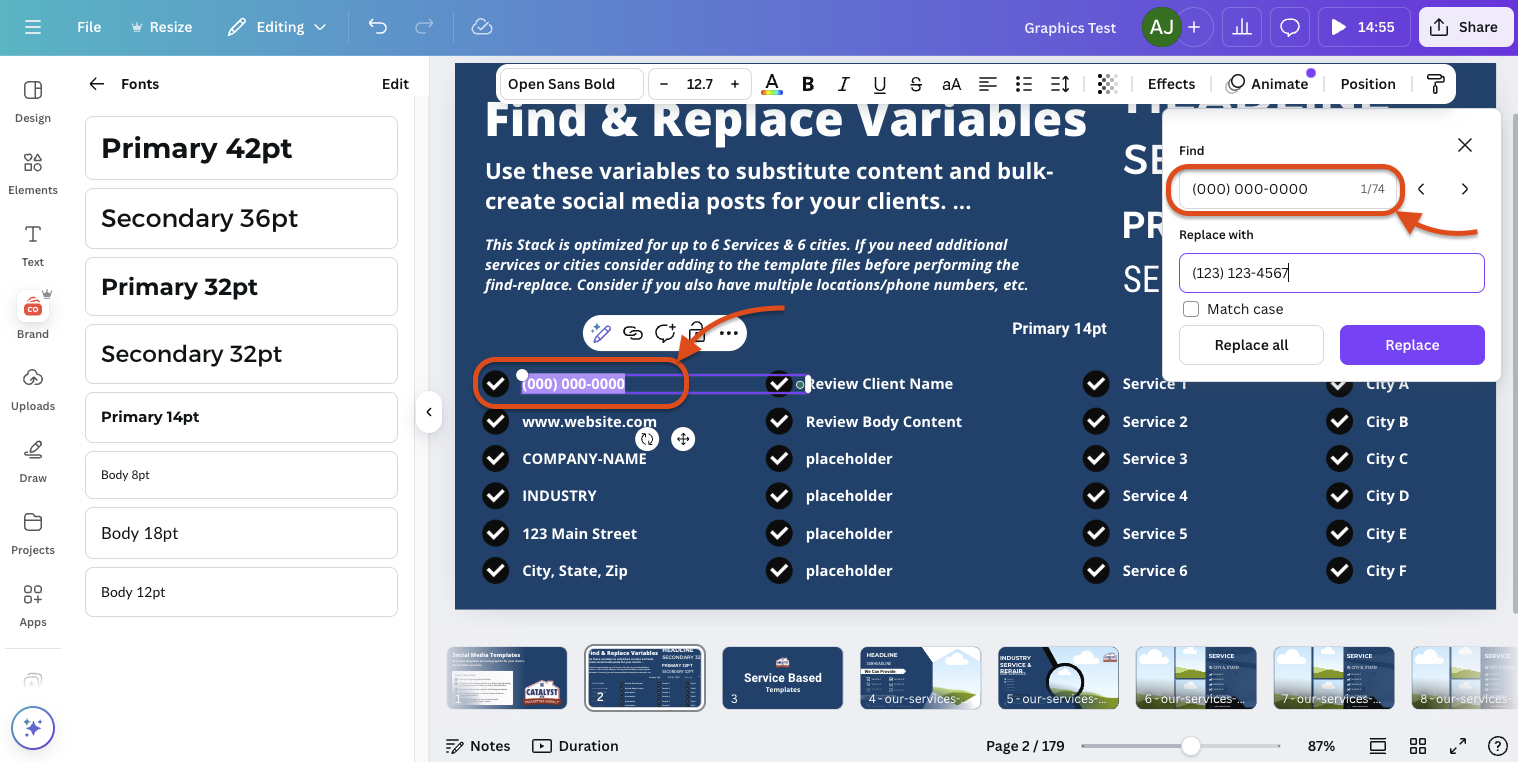
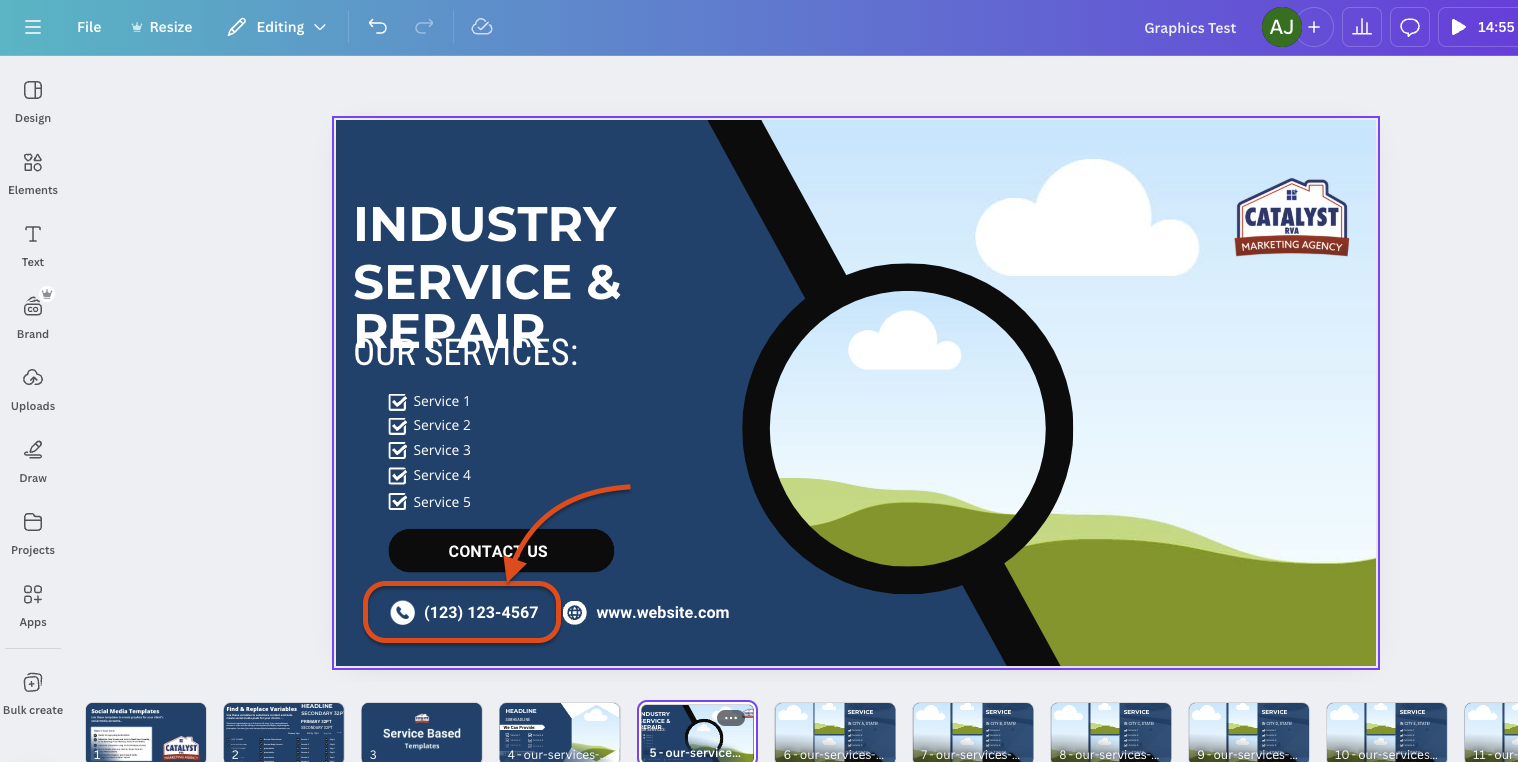
By clicking on the “replace all” button you will copy your phone number into the placeholders across All of the slides in the entire document. If you mess up don’t worry just use cmd+z or ctrl+z to undo. Repeat this process for all of the placeholders in the slide deck including services and cities. If you have more cities or services just pick your first six and you can go back and modify the slides on an individual basis later as needed. You can see below what happens as you click “replace all”.
Swapping out photographs
Our last step will be performed on an individual slide basis and cannot be automatically performed across the entire document, unfortunately… Click through the slides after all placeholders have been swapped out via the Find & Replace tool & add images and perform any cleanup as needed. To place images you can upload them to your Canva account and then drag them over the placeholder images on the slides as shown below.

Do your last happy dance because you should now have a full set of graphics (over 150) that you can use for your Facebook posts to keep that account active for your potential customers! To export all you have to do is click “share” to either download and post manually or post to your accounts from Canva.

Wrapping Up
There you have it! A full year of social media posts that you can most likely put together in a few hours. Please feel free to modify your copy as you see fit, update, tweak, change, destroy, whatever you need to do in order to get your graphics how you want them. If you have any questions, please let us know so we can modify this guide to be more complete for you and reduce any confusion in the process. If you would like to learn more about how to use Canva, consider checking out YouTube as there are a TON of features you can leverage inside the software for yourself!
Remember kids…
“If I had 6 hours to chop down a tree, I would spend the first 4 sharpening the axe.”
– Abraham Lincoln


